A bit of sewing was very relaxing over the last two weekends.

Meanwhile, I had a remnant of pin-striped wool/mix of only just over one metre (150cm wide) that I thought would make a good pencil skirt long ago. But it's been sitting alone in my sewing box (I don't really keep a stash) for two years-plus. I finally decided to take it out and use it.
I realized that a pencil skirt just wasn't enough motivation for me. Then, I thought of my daughter's "shovel-neck" sheath dresses, made twice; once in underlined lace and the other in a high-tech pleather and lined. Both were hits with her, but were so short that, of course, I could have made either version in a metre or less.
Could I squeeze a sheath for a grown-up out of so little fabric?
I looked at two designs, both from Burda. Although they are very similar, and both are designs that offer ample seaming for a nice fit, notice that the pieces of the second front give you more leeway in squeezing the most out of a short length of fabric than the awkwardly-shaped front of the first dress cut on the fold. I think I would have preferred the more generous sleeve of the first over the second, but I only noticed this too late. (I didn't sew the sleeves for the daughter's two dresses.)
This is one of the reasons I like the Burda Style magazines. People complain that they repeat themselves, but in fact, the Burda people tweak and vary hot designs to give you variations to suit your materials and desired "feel." I'm going to blog in my next post about a third shovel-neck sheath offered in the Burda Classic Collection magazine of November.
Here are the technical designs for the pattern used for daughter's sheaths, model 115 from October 09, and below that, the model from July 2011 I settled on, as photographed above, for the pin-striped remnant dress. I think of both as the sewist's quickie take on a fancy Galaxy dress, so popular years ago.

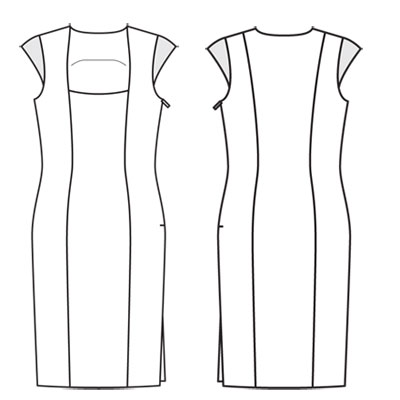
I made a couple of simple changes to this dress. First I added a burgundy satin lining, (also bought as a cheap remnant of one metre) underneath the inner front facing and substituting for the upper back facing. I omitted the interfacing on the sleeves as I didn't want wings, just sleeves, and as I had three layers rather than two at the neckline, didn't interface that either.


Most important, I wanted more pieces (and more flexibility) for an economical cutting layout. So I inserted the zipper into the middle of the center back, adding a seam where otherwise I would have been "cutting on the fold."
I used Nancy's technique for sewing the lining directly onto a sheath dress, stitching the neckline to the facing+lining and then sewing the raw edges of the outer sleeves along with the lower sleeve opening in one go, as if the sleeves were simply extensions on a sleeveless dress. I'll confess my corners on the dress neckline were a bit wonky, as it was difficult to align the dress seaming to a facing that had no seaming. (Note that to squeeze the facing out of my metre of fabric, I couldn't get it up to the fold. So I added a center seam. Next time, I'd just cut a lining in the color of the outer fabric with the same seaming as the dress pieces and discard the facing piece altogether.
I also shifted the walking vent to my new center back, from the side vent shown above.
I always prefer a back zipper construction to a side zipper placement because sewing the side seams absolutely last before hemming means that you can pop on the dress at the end of construction and simply mark chalk along where the side seams will give you a glove-like fit. (If the zipper were in place on one side, you wouldn't have that kind of symmetrical fitting flexibility.)
As I say, photos of the two finished dresses to come.
I agree with you, Burda's variations on a theme do come in handy. When I am not interested in a particular style, they all look same-y. When I am interested, I suddenly appreciate all the options and the little difference do matter quite a lot.
ReplyDeleteI also agree about side zips. I just find them more of a pain to sew/insert.
I am looking forward to seeing the finished dress.
That dress has been lurking on my to-sew list for a while. Can't wait to see your version!
ReplyDeleteI had my eye on those exact two dresses as well! Will be fun to see how it turned out. Agree on the side zip vs the back zip. I always need to take in the sides for a better fit and I need room below the hips, a back zip will allow me to pinch and give.
ReplyDeleteLove it when people get creative and make patterns work for them! Photos please?
ReplyDeleteBTW I nominated you for an One Lovely Blog Award a couple of days ago and forgot to inform you! Oops. I realize it’s a bit of a chain letter thing that not everyone want to participate in. But as I do enjoy you blog, I thought at the very least by nominating you more people might find and get to enjoy your blog too.
Anyway, should you wish to participate, you can find the One Lovely Blog Award rules and the award badge at my blog: http://overflowingstash.wordpress.com/2012/12/10/and-the-award-goes-to/
Happy holiday & good luck with finishing the novels :-)
Pia
This comment has been removed by the author.
ReplyDelete